
We’ve previously covered the topic of Bounce Rate in “7 Ways to Reduce Your Bounce Rate,” to help you improve this particular metric. But focusing on Bounce Rate without taking various factors into consideration won’t give you a solid picture of how well your website is doing. Let’s take this concept a little deeper and use some code to sculpt the Google Analytics data into a more accurate picture of website traffic.

First, let’s set the stage by defining the underlying principle behind the concept of Adjusted Bounce Rate in Google Analytics.
What is Bounce Rate?
As defined by Google Analytics Help:
Bounce Rate is the percentage of single-page sessions (i.e. sessions in which the person left your site from the entrance page without interacting with the page).
Can you say that in English? Of course. In Google Analytics’ calculation, a user “bounces” from your website when they visit your site and do not navigate to any other page or engage in a tracked event before they leave. In other words, hitting your website and “bouncing” away.
What is the problem with Bounce Rate?
The problem with Bounce Rate, in general, is that it does not factor in the duration of a website visit. Generally speaking, that may be OK, but if your website is built around content and content consumption, then the Bounce Rate metric is very misleading to understanding quality visits to your website. While a bounce does give you insight into how useful or relevant your content was, a bounced visit fails to track other Google Analytics metrics such as average time on page or session duration.
What is Adjusted Bounce Rate?
Adjusted Bounce Rate is the process of creating an action to trigger a trackable event in Google Analytics when someone is visiting your website. Typically this trackable event is a web page view that surpasses a pre-defined interval of time. Once the Event in Google Analytics is triggered, the viewer is no longer considered a bounce, even if they fail to visit another page on your website during their session.
Why should I use Adjusted Bounce Rate?
Adjusted Bounce Rate provides a more accurate picture into content consumption for websites that regularly produce content to inform, educate, or entertain the viewer. Ultimately each website should have have a conversion goal, but that doesn’t mean the every piece of content that you produce is intended to directly drive conversions. Implementing Adjusted Bounce Rate is a good idea for websites that:
- produce new content on a regular basis
- are primarily a blog
- display video content on landing pages
- are educational in format and have softer conversion (i.e. not e-commerce)
This is also true for our website, www.LTnow.com. We use our blog to inform and educate viewers, establish credibility, and create trust with those who need our professional technology services. In introducing Adjusted Bounce Rate on our website, we saw a dramatic change in the Bounce Rate metric. In the example below, you can see the impressive change in Bounce Rate for one of our top-performing blog posts.
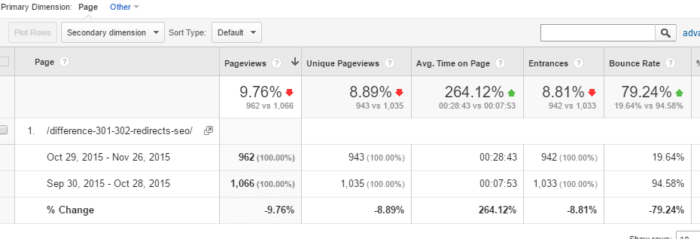
We defined the conversion on this post to be a visit over one minute. By better defining the parameters for a conversion, we got a more accurate picture of how well this post performed. We don’t count it as a bounce if they stayed for over 60 seconds and most likely read the article.
How do I “install” Adjusted Bounce Rate?
Adjusted Bounce Rate can provide a significant advantage to understanding and improving your website’s analytics, and it’s relatively simple to install. These instructions are specifically for Google Analytics.
Option 1 – Modify your Google Analytics tracking code manually.
Simply add the event trigger to your Google Analytics tracking code.
Standard Google Analytics tracking code:
<script>
 (function(i,s,o,g,r,a,m){i['GoogleAnalyticsObject']=r;i[r]=i[r]||function(){
 (i[r].q=i[r].q||[]).push(arguments)},i[r].l=1*new Date();a=s.createElement(o),
 m=s.getElementsByTagName(o)[0];a.async=1;a.src=g;m.parentNode.insertBefore(a,m)
 })(window,document,'script','https://www.google-analytics.com/analytics.js','ga');

 ga('create', 'UA-21XXXX72-1', 'auto');
 ga('send', 'pageview');
</script>
Google Analytics tracking code with the Adjusted Bounce Rate trigger:
<script>
 (function(i,s,o,g,r,a,m){i['GoogleAnalyticsObject']=r;i[r]=i[r]||function(){
 (i[r].q=i[r].q||[]).push(arguments)},i[r].l=1*new Date();a=s.createElement(o),
 m=s.getElementsByTagName(o)[0];a.async=1;a.src=g;m.parentNode.insertBefore(a,m)
 })(window,document,'script','https://www.google-analytics.com/analytics.js','ga');

 ga('create', 'UA-21XXXX72-1', 'auto');
 ga('send', 'pageview');
 setTimeout("ga('send','event','Engaged User','More than 60 seconds')",60000); // -- Adjusted Bounce Rate
</script>
Adjusted Bounce Rate uses JavaScript’s setTimeout function to trigger an event in Google Analytics after a defined period of time. In this example, the “60000” is the amount of time (milliseconds) that will pass before the function will fire. The 60000 number is changeable and in this example represents 60 seconds. Therefore, the Google Analytics Event Label is “More than 60 seconds.” You can change the time interval to whatever is best suited for your content.
Option 2 – Add Adjusted Bounce Rate snippet to your Google Analytics by MonsterInsights WordPress plugin
I’m not shy about my love for WordPress and I really enjoy using the WordPress plugin Google Analytics by MonsterInsights (formerly Google Analytics by Yoast). So to assist my fellow WordPress users out there, here is how you add Adjusted Bounce Rate to Google Analytics by MonsterInsights:
- Login to your WordPress admin
- Navigate to Insights > Settings
- Click on the Advanced tab
- Add your Adjusted Bounce Rate snippet in the Custom code: field
- Click the Save changes button

Example Adjusted Bounce Rate snippet:
setTimeout("__gaTracker('send','event','Engaged User','More than 60 seconds')",60000); // -- Adjusted Bounce RateNOTE: There is one key difference between Option 1 and Option 2. In Option 2, we use “__gaTracker” in place of “ga” to communicate with the Google Analytics API. This is because of a change that is introduced with using the Google Analytics by MonsterInsights WordPress plugin.
One Last Tip For Your Google Analytics When You Start Using Adjusted Bounce Rate
Remember to create an annotation in your Google Analytics view to document your change in adding Adjusted Bounce Rate. This technique will change your data, so save yourself the trouble of trying to remember when or why and go ahead and document your efforts.
Surprisingly, Adjusted Bounce Rate isn’t a brand new concept. In fact, Google very quietly published information about Adjusted Bounce Rate on their Analytics blog some time ago. They recognized that user engagement times vary from website to website, and developed Adjusted Bounce Rate so that website owners could determine the amount of engagement that could be counted as a conversion. If you want a more accurate picture of how well your website captures conversions, the Adjusted Bounce Rate metric can provide this information.
